Friday 5 April 2024

How To Upload Images to WordPress 2024 [ FAST! ]


Video Tutorial Link: https://youtu.be/ztdVQ90vkpI?si=l8-LjvOGCEpBAx9N


Dive into the world of WordPress with our lightning-fast tutorial, "How To Upload Images to WordPress 2024" Whether you're a blogger, business owner, or digital creator, mastering the art of uploading images quickly and efficiently is crucial in keeping your website fresh and engaging. This guide is designed to help WordPress users of all levels streamline their image upload process, ensuring your site stays visually captivating with minimal effort.


*Useful Links*

Elementor Pro - https://www.dcpweb.co.uk/go/elementor

Essential Addons - https://www.dcpweb.co.uk/go/essential-addons-elementor

Siteground WordPress Hosting - https://www.dcpweb.co.uk/go/siteground


*Subscribe for free access to 800+ Video Tutorials:* https://www.youtube.com/dcpwebdesigners


*Contact me at:*


Instagram: https://www.instagram.com/dcpwebdesigners/

Facebook: https://www.facebook.com/dcpwebdesigners/

Pinterest: https://www.pinterest.co.uk/dcpwebdesigners/

LinkedIn: https://www.linkedin.com/in/dcpwebdesigners/

Website:: https://www.dcpweb.co.uk


*Table of contents*


00:00:00 Introduction

00:00:30 Upload a single image to the WordPress Media Library

00:01:25 Upload multiple images to the WordPress Media Library

00:03:00 Create an image gallery with uploaded images


#WordPress #Tutorial


In this video, we'll cover everything you need to know about uploading images to WordPress in 2024, from the basics to some tips and tricks that even seasoned users might not be aware of.


We start with a brief overview of the WordPress media library, showing you how to navigate this essential tool with ease.


Then, the moment you've been waiting for: the step-by-step process of uploading your images to WordPress. We'll show you how to batch-upload images and organise them efficiently.


By the end of this video, you'll be equipped with the knowledge to upload images to your WordPress site faster than ever before, leaving you more time to focus on creating content that resonates with your audience.


Don't forget to like, share, and subscribe for more tips on making the most of WordPress in 2024 and beyond!


WordPress 2024, Fast Image Upload, WordPress Tutorial, WordPress Media Library, Quick WordPress Guide, WordPress for Beginners, Blogging Tips, Digital Content Creation, WordPress Efficiency, User-Friendly WordPress, how to add image in wordpress, wordpress how to add an image, wordpress tutorial, how to add an image to a wordpress website, wordpress image upload, wordpress tutorial for beginners 2024, How To Upload Images to WordPress, Bulk Upload Images to WordPress

Thursday 4 April 2024

Quick & Easy Anchor Links in WordPress: Master Elementor in Minutes!


Quick & Easy Anchor Links in WordPress: Master Elementor in Minutes!


Video Tutorial link: https://youtu.be/Yh508x1z0HM


Discover the fastest way to enhance your website navigation with our must-watch tutorial, "Quick & Easy Anchor Links in WordPress: Master Elementor in Minutes!" Whether you're building a one-page website, a landing page, or just want to streamline navigation on your site, this video is packed with actionable insights to help you implement smooth, efficient anchor links using WordPress and Elementor.


*Subscribe for free access to 800+ Video Tutorials:* https://www.youtube.com/dcpwebdesigners


*Contact me at:*


Instagram: https://www.instagram.com/dcpwebdesigners/

Facebook: https://www.facebook.com/dcpwebdesigners/

Pinterest: https://www.pinterest.co.uk/dcpwebdesigners/

LinkedIn: https://www.linkedin.com/in/dcpwebdesigners/

Website:: https://www.dcpweb.co.uk


*Table of contents*


00:00:00 Introduction

00:00:34 Add anchor to page

00:02:12 Add a link to the anchor

00:03:05 Add a link to the anchor from another page

00:05:40 Add anchor to CSS ID

00:07:30 Add a link to the anchor from the navigation menu


#WordPress 'Elementor #Tutorial


Anchor links, also known as jump links, are a vital web design feature, allowing users to jump to specific sections of a page with just a click. They not only improve user experience but also make your website content more accessible. And with Elementor, creating these links is simpler and faster than ever.


In this concise guide, we'll walk you through the process from start to finish. You'll learn how to identify sections in your Elementor layout that would benefit from anchor links, how to correctly add these anchors using Elementor's intuitive interface, and how to link text or images to these anchors for seamless navigation.


But we don't stop at the basics. You'll also get insider tips on customizing the scroll behavior to match your site's design and user expectations, ensuring that your anchor links provide a smooth, satisfying experience for all visitors. Plus, we'll show you how to troubleshoot common issues that might arise during the process.


By the end of our tutorial, you'll be equipped with the knowledge to implement effective anchor links on your WordPress site, making it more navigable and user-friendly. Whether you're a seasoned developer or a DIY website owner, our straightforward, step-by-step approach will save you time and elevate your site's functionality.


Don't forget to like, share, and subscribe for more WordPress and Elementor tips, tricks, and tutorials. Let's dive in and transform your website navigation together!


WordPress Anchor Links, Elementor Tutorial, Quick Elementor Guide, Fast Web Design Tips, Elementor Page Builder, Smooth Scroll Elementor, Website Improvement, Elementor Design Tricks, User Experience Design, Web Development, Anchor Link Setup, WordPress Website Tips, Elementor Features, Easy Website Navigation, how to create anchor links in wordpress, how to create anchor links, anchor links, anchor links in wordpress, how to create anchor links in elementor

Wednesday 3 April 2024

How to upload PDF files to WordPress and create a share link [Simple Tutorial]


Video tutorial link: https://youtu.be/kFgSXaVMtME

Unlock the power of sharing knowledge and resources on your website with our comprehensive tutorial, "Quick PDF Uploads to WordPress: Share Links Effortlessly!" This video is tailored for WordPress users who want to enhance their site by uploading and sharing PDF files, whether for downloadable resources, product manuals, eBooks, or any other valuable content. Our guide simplifies the process, ensuring that you can share information with your audience smoothly and efficiently.


*Subscribe for free access to 800+ Video Tutorials:* https://www.youtube.com/dcpwebdesigners


*Contact me at:*


Instagram: https://www.instagram.com/dcpwebdesigners/

Facebook: https://www.facebook.com/dcpwebdesigners/

Pinterest: https://www.pinterest.co.uk/dcpwebdesigners/

LinkedIn: https://www.linkedin.com/in/dcpwebdesigners/

Website:: https://www.dcpweb.co.uk


*Table of contents*


00:00:00 Introduction

00:01:30 Upload PDF file

00:02:05 Copy PDF file URL

00:02:20 Test load PDF file

00:02:50 Add PDF file link to a button using Elementor Pro

00:03:40 Add PDF file link to text content using Elementor Pro

00:04:45 Test PDF download


#WordPress #Tutorial


Uploading PDF files to your WordPress site and sharing them via link can significantly improve your site's value, offering your visitors easy access to important resources. However, the process can seem daunting if you're unfamiliar with the WordPress platform. This tutorial aims to demystify the steps involved, making it accessible to everyone from complete beginners to more experienced users looking to streamline their workflow.


*In this video, we'll cover:*


- A step-by-step guide on how to upload PDF files to your WordPress media library quickly.

- How to insert uploaded PDFs into your posts and pages, creating downloadable links for your visitors.

- Tips for organising your PDF files within WordPress to keep your media library tidy and manageable.

- Best practices for sharing your PDF links, ensuring they're secure and accessible.


By the end of our tutorial, you'll not only know how to upload and share PDF files with ease but also understand how to leverage these resources to enhance user engagement and provide value to your website visitors. 


Don't forget to like, share, and subscribe for more invaluable WordPress tips and tricks. Let's elevate your WordPress skills together, making your site a hub of information and resources!

Thursday 28 March 2024

Master 3D Tilt Mouse Tracking with Elementor Pro: A Step-by-Step Guide!


Video Tutorial Link: https://youtu.be/DfXMNnrWkYk


Dive into the world of interactive web design with our detailed tutorial on "Master 3D Tilt Mouse Tracking with Elementor Pro: A Step-by-Step Guide!" This video is your ultimate roadmap to enhancing user engagement and bringing a dynamic layer to your website's visuals using the powerful features of Elementor Pro.


*Useful Links*

Elementor Pro - https://www.dcpweb.co.uk/go/elementor

Essential Addons - https://www.dcpweb.co.uk/go/essential-addons-elementor

Siteground WordPress Hosting - https://www.dcpweb.co.uk/go/siteground


*Subscribe for free access to 800+ Video Tutorials:* https://www.youtube.com/dcpwebdesigners


*Contact me at:*


Instagram: https://www.instagram.com/dcpwebdesigners/

Facebook: https://www.facebook.com/dcpwebdesigners/

Pinterest: https://www.pinterest.co.uk/dcpwebdesigners/

LinkedIn: https://www.linkedin.com/in/dcpwebdesigners/

Website:: https://www.dcpweb.co.uk


*Table of contents*


00:00:00 Introduction

00:01:20 Select an object to apply 3D mouse tilt in Elementor Pro

00:01:40 Select the "Advanced" tab and then the submenu "Motion Effects"

00:01:50 Enable "Mouse Effects" and apply the 3D tilt effect

00:03:20 Apply 3D tilt effect to button

00:04:10 Apply 3D tilt effect to text content

00:04:50 Example Elementor 3D tilt website usage


#ElementorPro #Tutorial


In this comprehensive guide, we'll walk you through the process of implementing 3D tilt effects on your website elements, responsive to mouse movements. Whether you're a web design enthusiast, a professional looking to elevate your portfolio, or a business owner aiming to captivate your audience, this tutorial is designed with you in mind.


We'll start by introducing you to the basics of Elementor Pro, focusing on its unique features that make such effects possible. Then, we'll dive into a hands-on demonstration where we'll apply the 3D tilt mouse tracking effect step by step. You'll learn how to select the right elements for the effect, adjust the depth and movement sensitivity, and customise the animation to fit the style and theme of your website.


Not only will you see the immediate transformation of your website elements, but we'll also share best practices for user experience, ensuring your site remains accessible and enjoyable for all visitors. Throughout the tutorial, we'll provide pro tips to help you troubleshoot common challenges and optimise your design for all devices.


By the end of this video, you'll have the skills and confidence to implement stunning 3D tilt effects, making your website stand out from the crowd. Remember, interactive web design is not just about aesthetics; it's about creating immersive experiences that engage and retain your audience.


So, grab your mouse, open up Elementor Pro, and let's start crafting a website that comes to life with every move. Don't forget to like, share, and subscribe for more insightful tutorials on taking your web design skills to the next level!


Elementor Pro Tutorial, 3D Tilt Mouse Tracking, Interactive Web Design, Elementor Pro Tips, Advanced Elementor Techniques, Web Design Tutorials, Elementor Pro Mouse Effects, Custom Web Effects, Step-by-Step Elementor Guide, Elementor Animation Effects, User Experience Design, Elementor 3D Effects, Dynamic Web Content, Elementor Pro Design, Website Enhancement with Elementor

Wednesday 18 May 2022

Why Hire a Professional Web Designer in London?

 Web design is a fast-paced industry, and as a result, so are the needs of any company looking to hire a new Web designer in London. There are many different opportunities for freelancers and small businesses to get their websites designed.

However, for a company looking to increase its online presence and attract new customers, hiring a web designer in London is the perfect step.

When you consider that most people only have about 30 seconds to impress potential buyers before they make their buy decision, having a well-designed website is crucial.

If you have time restrictions or don’t know where your target market lives, then hiring a designer may not be an option. But if you’re prepared to put in the work to make sure your site stands out from the rest, then it might be worth exploring opportunities with design agencies in London.

So how do you find the right agency? It's not quite as simple as looking at their portfolio - after all, everyone has their own unique needs and wants when it comes to designing websites.

To find the best web designers in London, you need to search Google and check the company's reviews on Google.


What is a web designer?

A web designer is a professional who specializes in designing websites, they may use a system like WordPress or custom build a website solution for more complex web projects.

You’ll often hire a web designer to take care of the following:

Different types of website

There are a few different types of websites you’ll come across when you’re looking for web designers in London.

It’s not just a one-size-fits-all solution, after all — there are different design preferences and needs in different industries and verticals.

So, to get a better understanding of what types of website you may want, take a look at the following:

How to find the best web designers in London

There are a few ways you can find the best web designers in London.

Start with research — you can do that by looking at who your competitors are hiring.

Then, once you’ve found a few designers to work with, check their portfolio of websites to see what they’ve designed.

See if they can deliver something special. If they don’t, keep looking — there’s no need to settle for anything less than the best!

Web designer specific research

Just as you’d want to research a new city before moving there, you should do the same for a web designer.

Start by reading up on the web company you’re interested in, to familiarize yourself with their previously completed work.

Pick up the phone and see if they respond to your business website design ideas.

See if the website company gives you advice when speaking to them the first time, are they just robots following orders or do they really understand how web technology works and the true benefits of search engine optimisation?

If you ask them for more information, see how long it takes them to reply, if they truly want your business they will reply ASAP with detailed information to answer all your questions.

See if you can call them during normal working hours or even better meet your potential web designer face to face.

You can also check how long the business has been established by simply doing a check on Companies House.

Check out references

When it comes to hiring a new web designer, you don’t want to take someone’s word for it. You want to check out references - especially when the person you’ll be working with claims to be a web design expert.

You can check out references by searching Google, or by checking out the testimonials on their website.

After you’ve verified that a reference checks out, you should call them rather than email to make sure you are speaking to someone who really cares if your business succeeds. 

Conclusion

The best way to find a website designer in London is to do some research and come up with a list of potential candidates.

From there, you can narrow your choices down to find the best possible designers by simply picking up the phone and testing your knowledge.

If the designer gives you a quote for a website project in the first 60 seconds of a conversation then I would suggest you avoid them, after all a web development company should first learn about your goal and business before even considering the cost of a web project.

Article by Pankaj Shah: DCP website designers London UK

Sunday 11 April 2021

Blender 2.8 Screencast Keys Addon Tutorial

 You can view the original post of this tutorial here: https://www.dcpweb.co.uk/blog/blender-2-8-screencast-keys-addon-tutorial#video-tutorial

Blender screencast keys tutorial

In this video tutorial, I will show you how to set up and install Blender 2.8 Screencast Keys Addon.

I will also show you how to change the font colour, font size and enable the addon when making tutorials for Blender 3D.

Key elements we will cover in this video tutorial:

  • Download the Blender Screen Cast Keys addon Version 3.0
  • Open Blender 2.8 and go to Edit / Preferences
  • Select the Addons tab
  • Click the install button
  • Navigate to the screencast keys addon zip file which you downloaded and select
  • Click the Install Addon from the file button
  • Use the Addon search function to find screencast keys and click the "checkbox" to enable the plugin
  • Close down the preferences window
  • To access the screencast keys addon you need to press the letter "N" on your keyboard to open the "transform" side panel
  • Select the screencast keys tab
  • Select the "checkbox" to enable screencast keys
  • Change the font size and colour to make keylogging and mouse clicks on the screen more visible

Blender Screencast Keys Demo

Blender screencast keys demo

Install Blender Screen Cast Keys tutorial steps:

Step 1 - Download screencast keys addon


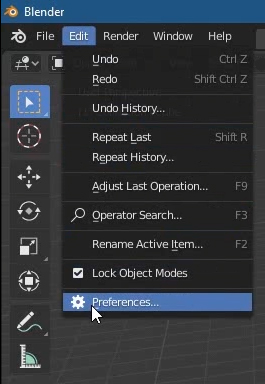
Step 2 - Open Blender Preferences

  • Launch Blender 3D.
  • Go to "Edit" Menu and then select "Preferences".

Blender edit menu preferences


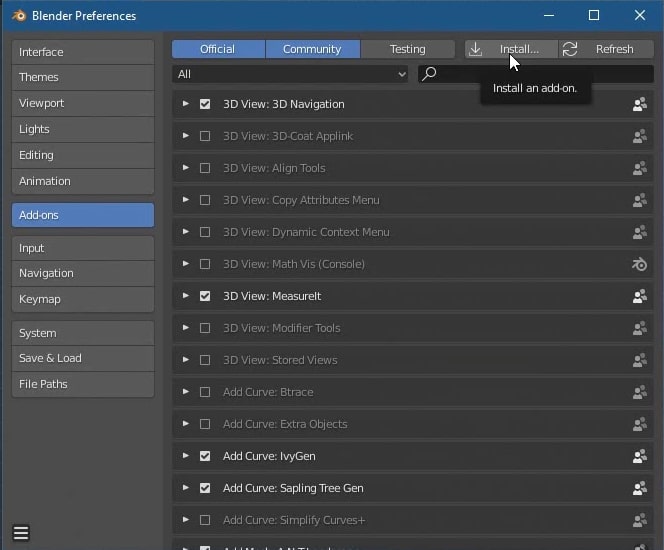
Step 3 - Install screencast keys addon

  • Select the "Addon" tab from left side options.
  • Select the "Install" button.

Blender edit menu preferences


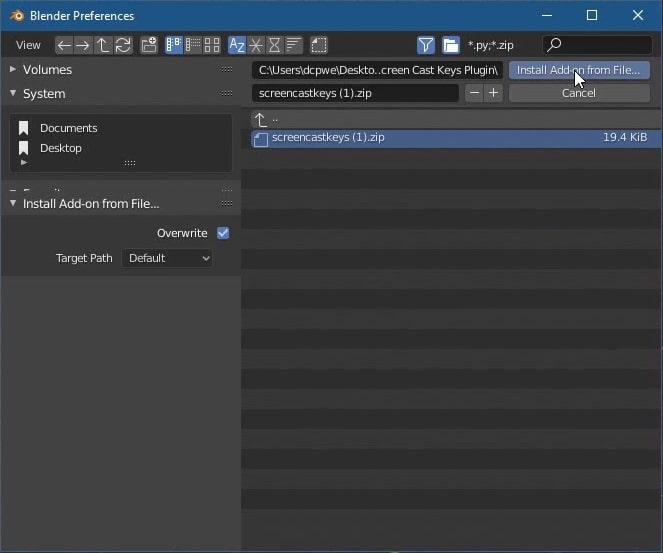
Step 4 - Select the downloaded screencast zip file

  • Go to the location where you saved the screencast keys download file.
  • Select the file and then select the "Install add-on from file" button.

Select downloaded screencast keys zip file


Step 5 - Enable screencast keys addon

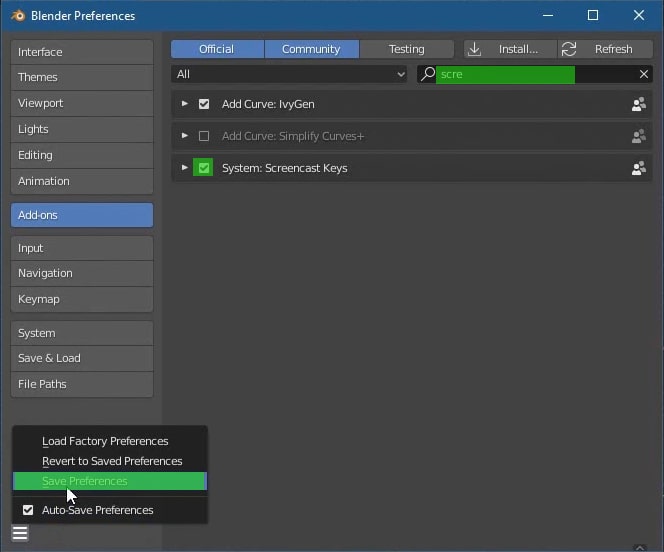
  • Search for the screencast keys addon.
  • Select the checkbox to enable.
  • Select the "save preferences" button.

Enable screencast keys


Step 6 - Enable screencast keys addon

  • Search for the screencast keys addon.
  • Select the checkbox to enable.
  • Select the "save preferences" button.

Enable screencast keys


Step 6 - Screencast keys options

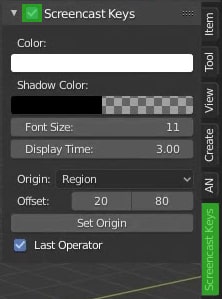
  • Go to the Blender viewport and press the letter "N" on your keyboard to open the right-side panel.
  • Select the screencast keys tab.
  • Select the checkbox to enable screencast keys.
  • Adjust the options as required.

Screencast keys settings


Blender screencast keys video tutorial


More tutorials for Blender tutorials

YouTube Blender Screencast Keys Tutorial

Download Free blender screencast keys PDF Guide


Blender Video Tutorial By Pankaj Shah  | YouTube Video Editors

Wednesday 31 March 2021

How to remove background from image using GIMP 2.10 - [ Remove Background Tutorial 2021 ]


How to remove background from image using GIMP 2.10 - [ Remove Background Tutorial 2021 ]

In this video tutorial, I will show you how to remove background from an image using GIMP 2.10. I will show you 7 different techniques for removing backgrounds from images. The techniques used will depend on the complexity of the images.

GIMP #Tutorial #RemoveBackground #dcpweb

Download images for this tutorial

Circle Shape Image - https://unsplash.com/photos/dKCKiC0BQtU
Square Shape Image - https://unsplash.com/photos/KuudDjBHIlA
Fuzzy Select Tool Image - https://unsplash.com/photos/qVMna-UqTUY
Path Tool Image - https://unsplash.com/photos/OlKkCmToXEs
Select by Colour Image - https://pixabay.com/vectors/flowers-spring-flowerpot-plant-6080769/
Foreground Select Tool Image - https://www.pexels.com/photo/person-holding-a-smartphone-892757/
Layer Mask Image - https://www.pexels.com/photo/focus-photo-of-super-mario-luigi-and-yoshi-figurines-163036/

Sample background images:

https://unsplash.com/photos/BlIhVfXbi9s
https://unsplash.com/photos/1527pjeb6jg
https://www.pexels.com/photo/people-sitting-on-chairs-beside-their-desks-in-an-office-1170412/

Video Tutorial Chapters

00:00 Introduction
00:16 Chapter 1 - Download a picture of a football and import it into GIMP
02:00 Chapter 2 - Add guides in GIMP
02:24 Chapter 3 - Select the ellipse selection tool
02:30 Chapter 4 - Make a selection using the left mouse button and hold the shift and CTRL key to constraint the selection
03:40 Chapter 5 - Add an alpha channel to the image
04:16 Chapter 6 - Invert the selection
04:30 Chapter 7 - Select edit/cut to remove the background
09:20 Chapter 8 - Save the cutout image as a new GIMP file and then copy the cut out to new artwork

09:22 Chapter 9 - Download a picture of a room with picture frames on the wall and import it into GIMP
09:44 Chapter 10 - Select the rectangle selection tool
09:50 Chapter 11 - Left click and hold down the mouse button on the top left of a picture frame in the imported image and draw a selection around the picture frame
10:32 Chapter 12 - Invert the selection
10:39 Chapter 13 - Select edit/cut to remove the background
10:50 Chapter 14 - Save the cutout image as a new GIMP file and then copy the cut out to new artwork

15:40 Chapter 15 - Download a picture of a woman and import it into GIMP
16:15 Chapter 16 - Select the fuzzy select tool
16:20 Chapter 17 - Adjust fuzzy select tool settings
17:35 Chapter 18 - Left click inside the image to make a selection
17:46 Chapter 18 - Select edit/cut to remove the background
19:13 Chapter 19 - Create a new red background layer
20:15 Chapter 20 - Use the eraser tool to remove artefacts from the image (Clean Selection)
24:00 Chapter 21 - Save the cutout image as a new GIMP file and then copy the cut out to new artwork

27:19 Chapter 22 - Download a picture of a bird and import it into GIMP
27:35 Chapter 23 - Select the path selection tool
27:40 Chapter 24 - Zoom into the image and left-click to start the path selection, continuing left clicking around the image to complete a whole selection
40:35 Chapter 25 - Add an alpha channel to the image
40:40 Chapter 26 - Invert the selection
40:42 Chapter 27 - Select edit/cut to remove the background
47:55 Chapter 28 - Save the cutout image as a new GIMP file and then copy the cut out to new artwork

47:00 Chapter 29 - Download a picture of plant pots and import it into GIMP
47:22 Chapter 30 - Select the select by color tool
47:30 Chapter 30 - Adjust the select by color tool settings
48:00 Chapter 31 - Select a specific colour in the image by left-clicking
48:10 Chapter 32 - Make colour adjustments as required

51:10 Chapter 33 - Download a picture of a   mobile phone and import it into GIMP and add apha channel
51:30 Chapter 34 - Select the foreground select tool
51:40 Chapter 35 - Draw selection around the outside of the object you want to remove the background
53:30 Chapter 36 - Use the paintbrush tool to highlight the content you want to keep and then click the "select" button in the foreground select tool
01:07:30 Chapter 37 - Create a new layer and then go to edit/copy and paste into the new layer
01:10:00 Chapter 38 - Use the eraser tool to clean up the selection
01:12:00 Chapter 39 - Save the cutout image as a new GIMP file and then copy the cut out to new artwork

01:15:00 Chapter 40 - Download a picture of Mario and import it into GIMP
01:15:30 Chapter 41 - Use the rectangle tool to crop the image
01:16:26 Chapter 42 - Add an alpha channel to the image and duplicate the layer
01:16:32 Chapter 43 - Go to Colors in the top navigation and select invert
01:16:50 Chapter 44 - Use the paintbrush to paint the content you want to keep in white color
01:31:10 Chapter 45 - Copy the top layer which has white selection content
01:31:25 Chapter 46 - Right-click on the bottom layer and add a layer mask
01:31:50 Chapter 47 - Select edit/paste in place
01:32:18 Chapter 48 - Use the eraser tool to clean up the selection
01:48:30 Chapter 39 - Save the cutout image as a new GIMP file and then copy the cut out to new artwork

Monday 30 November 2020

How to highlight mouse cursor for YouTube Videos

How to highlight mouse cursor for YouTube Videos


How to highlight mouse cursor for YouTube Videos

In this video tutorial, I will show you How to highlight mouse cursor for YouTube Videos. I will show you how to set up free software which will highlight mouse cursor in windows 10

Subscribe to access 600+ video tutorials: https://www.youtube.com/dcpwebdesigners

Download Auto Hot Key: https://www.autohotkey.com/

Here are the key concepts you will learn in this video tutorial:

Download auto hot key free software
Download PowerPoint Inking Toolbar 2.2.ahk file
Double click PowerPoint Inking Toolbar 2.2.ahk
Accept creation of ini file
Select mouse pointer highlight tool
Edit ini file to change colour and diameter of the mouse pointer highlight

Other Useful YouTube Tutorials:

How to edit YouTube Videos in 10 Minutes - [ Premiere Pro 2021 Tutorial ] - https://youtu.be/N39XLY3ssVc

Create a YouTube thumbnail in Adobe Photoshop - https://youtu.be/BEugabrjJ30

YouTube Sound Effects No Copyright - https://youtu.be/0p0zEgO_CQ4

How to create a YouTube Subscribe Link - https://youtu.be/3oXkRkVuIJQ

YouTube Picture in Picture Tutorial - https://youtu.be/Pk7Q4gEDMvo


***********************************************************************************

Need an awesome website for your business? - Simply contact DCP Web Designers for a free quote today - https://www.dcpweb.co.uk

***********************************************************************************

Contact me on:


Free tutorials, infographics, articles: https://www.dcpweb.co.uk/blog

#dcpweb #MouseCursor #Tutorial

How to highlight mouse cursor for YouTube Videos, highlight mouse cursor for youtube videos, mouse cursor highlight for youtube videos, mouse cursor highlight for videos, highlight mouse cursor for videos, highlight mouse cursor in windows 10, How to highlight mouse pointer for YouTube Videos, how to highlight mouse pointer windows 10, mouse pointer highlight windows 10, windows 10 mouse pointer highlight, how to highlight mouse pointer, get yellow circle around the mouse

Sunday 29 November 2020

How to Move Video Clips Frame by Frame in Premiere Pro 2021


How to Move Video Clips Frame by Frame in Premiere Pro 2021

Tutorial Link: https://youtu.be/6JYgShmzzXU

In this video tutorial, I will show you How to Move Video Clips Frame by Frame in Premiere Pro 2021.

Subscribe to access 600+ video tutorials: https://www.youtube.com/dcpwebdesigners

Premiere Pro 2021 Beginners Tutorial: https://youtu.be/gDbWqUdwrSo

***********************************************************************************

Need an amazing website for your business? - Simply contact DCP Web Designers for a free quote today - https://www.dcpweb.co.uk

***********************************************************************************

Contact me on:

Instagram: https://www.instagram.com/dcp_web_designers/

Facebook: https://www.facebook.com/dcpwebdesigners/

Pinterest: https://www.pinterest.co.uk/dcpwebdesigners/

LinkedIn: https://www.linkedin.com/in/dcpwebdesigners/

#AdobePremierePro #Tutorial #dcpweb

More Free tutorials, infographics, articles: https://www.dcpweb.co.uk/blog

How to Move Video Clips Frame by Frame in Premiere Pro 2021, move video clips frame by frame in premiere pro 2021, move video frame by frame in premiere pro 2021, How to Move Clips Frame by Frame in Premiere Pro 2021, move clips frame by frame in premiere pro, move video clips frame by frame in premiere pro, move video clips frame by frame premiere pro, premiere pro move video clips frame by frame, premiere pro move clips frame by frame, premiere pro cc move clips frame by frame


Saturday 28 November 2020

how to remove background in photoshop 2021

how to remove background in photoshop 2021


In this video tutorial, I will show you how to remove background in photoshop 2021.


Subscribe to access 600+ video tutorials: https://www.youtube.com/dcpwebdesigners

Content Aware Fill Tutorial - Adobe Photoshop 2021 Tutorial: https://youtu.be/GKOesIBzfeU

***********************************************************************************

Need a super website for your business? - Simply contact DCP Web Designers for a free quote today - https://www.dcpweb.co.uk/website-design

***********************************************************************************
Contact me on:


Free tutorials, infographics, articles: https://www.dcpweb.co.uk/blog

#AdobePhotoshop #Tutorial #dcpweb

More Free tutorials, infographics, articles: https://www.dcpweb.co.uk/blog

how to remove background in photoshop 2021, remove background in photoshop 2021, photoshop 2021 remove background from image, photoshop cc 2021 remove background from image, remove background from image photoshop, remove background from image photoshop 2021, remove background from photo photoshop 2021, remove background from picture photoshop 2021, photoshop 2021 remove background from picture, photoshop 2021 remove background from photo, photoshop 2021 remove background

Libre Office 7 Calc Spreadsheets Beginners Tutorial

Libre Office 7 Calc Spreadsheets Beginners Tutorial

Video Tutorial Link: https://youtu.be/bgO40-CjYNY


Libre Office 7 Calc Spreadsheets Beginners Tutorial - In this video tutorial, I will show you how to use Libre Office 7 Calc Spreadsheet for various data entry and manipulation tasks.

Subscribe to access 600+ video tutorials: https://www.youtube.com/dcpwebdesigners

Here are the key concepts you will learn in this video Libre Office 7 Calc Spreadsheets Beginners tutorial:

Create a new Calc spreadsheet
Save the file in "Libre Office" format and "Excel" format
Create basic formulas for adding, subtracting and dividing numbers
Create a new sheet in the same document
Create a personal cost spreadsheet
Create a Column chart
Create a Pie chart
Alignment of cell content
Bold headers
Fix column width
Fix row height
Save a spreadsheet as PDf file
Change page layout to landscape
Move spreadsheet content for optimising the print layout
Create a simple invoice tracking system
Change cell formats
Add cell boarders
Add auto filters
Change cell background colour

***********************************************************************************

How to Install Libre Office 7 - Free Office Applications: https://youtu.be/mdG0TtL5m5k

Booking Keeping Tutorials:

Bookkeeping for Small Business - Excel Tutorial - Part 1 - https://youtu.be/XDnBV-Tlb2g

Bookkeeping for Small Business - Excel Tutorial - Part 2 - https://youtu.be/Ap4QyvMPuV4

Bookkeeping for Small Business - Excel Tutorial - Part 3 - https://youtu.be/BS7hs4Isx5I

Bookkeeping for Small Business - Excel Tutorial - Part 4 - https://youtu.be/pBTXRNr3qaE


***********************************************************************************

Need an amazing website for your business? - Simply contact DCP Web Designers for a free quote today - https://www.dcpweb.co.uk

***********************************************************************************

Contact me on:


Free tutorials, infographics, articles: https://www.dcpweb.co.uk/blog

#LibreOfficeCalc #Tutorial #dcpweb

libre office 7 calc spreadsheets beginners tutorial, libre office calc spreadsheets beginners tutorial, libre office calc spreadsheets tutorial, calc spreadsheets tutorial, calc spreadsheets beginners tutorial, libre spreadsheets beginners tutorial, spreadsheets beginners tutorial, spreadsheets tutorial, spreadsheet beginners tutorial, spreadsheet tutorial for beginners, libre spreadsheet tutorial for beginners, libre office spreadsheet tutorial for beginners, calc spreadsheet

How To Upload Images to WordPress 2024 [ FAST! ]
Video Tutorial Link: https://youtu.be/ztdVQ90vkpI?si=l8-LjvOGCEpBAx9N Dive into the world of WordPress with our lightning-fast tutorial, &qu...